2009-03-22

More on the figure...

Currently roughly at 40% progress, more details will be added. Here are some shots...


2008-07-27

1:600 scale Titanic - scratch build the railing..

http://www.hlj.com/product/ACD1459

This 1:600 scale Titanic by Academy is pretty good, but there are rooms for improvement. The railing parts that come with the kit.. well its not railing anymore but a thick white wall with holes instead (you can see it from the link above). I decided to rebuild this.

I could use the Photoetch part, but where would the challenge be? ;)

So here it goes..

The line I used are made from pulling the heated sprue. If enough practice, you could control the thickness at will (some could be so fine that you could barely see it :P). The tricky bit is how to work with lines this fine, I had to come up with some way to make it easier for myself.

Here is the holder I created for making the railing. And the line below is what I 'will be using for the railing. It has to look right for the scale.


After around 2 hours, here is railing.. all I need to do is cut it off.

And here it is..

Railing installed. It is a little twisted after installed but this can be corrected later


All the tools and parts :)


2008-07-12

2008-07-10

Beach (get ready for oil)


Just testing out without getting my hands dirty, in the final oil there will be more detail.. Click to view the full size..

2008-04-28

RX78 FG 1/144

OK.. here is the 1/144 scale First Grade kit of the famous RX-78 Gundam.


This is suppose to be the cheapest Gundam kit ever at its time (around NZD $5), therefore we really can't expect it to have all the cool features of a Master Grade kit. Take a look at the instruction manual, a leg is made up of only 6 pieces.


But a simple kit like this offers the greatest opportunity for modification. So here we go, start from the bottom up.

The Leg!

This is what it looked like before the modification. Actually this is about half way into a failed attempt, but the knee portion remain untouched. It could only bend 90 degrees, which is really poor.

Now, the new version! Looks about the same.
And it starts bending...
Note how the top portion of the leg armor also move along, pretty similiar to some Master Grade kit.
The knee armor moves too...

Ok.. I couldn't hold my camera steady, definitely need more coffee..Some details..


Most of the inner mechanism are not detailed.. that will be addressed later.

Its been a while..

Its been so long since I updated this blog and its about time. I will upload some new pic tonight...

2007-02-27

MG GP01 製作日記 (2)

自從上次的更新後, 做了一些更動: 除了切開腰部裝甲, 裝入球型關結讓它提高可動度. 也製作了部份內構. 手部添加細節, 將胸部線條修得方正些. 我一直不喜歡 GP01 大腿的直線條紋也在這把它給去掉了. 同樣膝蓋裝甲的線條也修得圓滿一點..


因為拿掉了 Core Fighter 2, 所以背包現在是空的. 目前在考慮如何利用這個得來不易的空間 :P
頭部也切開了一部份, 準備置入一些細部.對了, 下半身裝甲也調整過形狀喔.

2007-02-11

MG GP01 製作日記 (1)

GP01 是我一直以來都很喜歡的機體. MG 版是由 Katoki Hajime 負責設計, 將河森正治先生的原設計作機件合理化的重設, 調整了身體四肢比例, 讓它看起來較矯健些.

不過, 這款畢竟是 MG 系列的早期作品 (1997 年), 以現在的眼光來看, 能改善的地方當然不少. Core Fighter 2 是機體的一部份, 模型內並未另附替代套件讓玩家能同時展示 GP01 與 Core Fighter 2. 因此決定不使用 Core Fighter 2, 缺乏的部份自行制作. 並可借此機會改善上半身的可動性, 如頸部, 兩肩, 腰部等的關節. 以下是針對兩肩關節的改善:

最近 MG 模型在肩部關節的設計是有提高了可動性, 上下前後都能活動, 但不知怎麼的就是不能將手臂向前伸, 因此一些較具動感的 Pose 就做不出來了 (如光劍刺擊, 等等). 原因是肩部的空間有限, 零件互相限制, 就算是使用球關節, 能作出的改善也很有限.

另一個問題是兩肩上下活動的能力. MG Strike Gundam 開始以來的設計是個不錯的方案. 但若是肩上有重要零件不能移位的話就不可行了 (如 GP01 兩肩上有監視器).

因此問題必須以其他方式解決...


在這裡, 兩肩關節採用雙節轉動式. 除了上下前後活動沒問題外, 也能將關節拉出, 提高活動的空間. 除此外, 掏空 Core Fighter 2 空出了很多可利用的空間. 因此在這裡能看到的其實是內部全身骨幹的一部份喔. 以後會將 Core Fighter 2 與其它可視部份的機件在裡面重建出來.
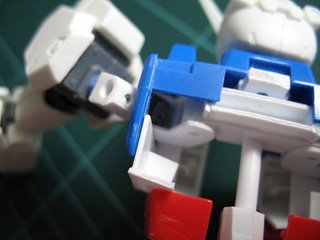

這是將左肩稍微拉出來的樣子.


抬手當然不是問題. 現在看上去不怎麼好看, 但細節的部份在整體骨幹完成後會逐一加入.
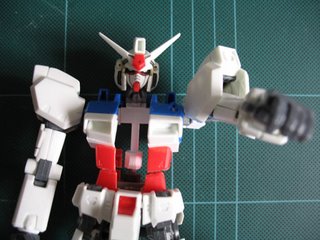

手向前伸的模樣.
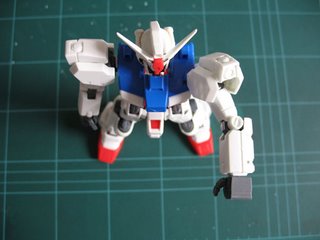

由上方俯視. 在提高活動空間後, 其實能作出的動作還不少喔. 等完成後再逐一介紹吧 ^_^